Pipeline
Naas provides a powerful and easy-to-use tool for building notebook-based pipelines. With the ability to create "Dummy Steps", "Notebook Steps", and "Parallel Steps", Naas allows you to easily build complex pipelines that can handle a wide variety of tasks. The ability to monitor your pipeline through visual displays (DAG or table), color coding, and the pipeline execution folder and "on error feature" make it easy to troubleshoot any issues and improve the performance of your pipeline over time.
The Notebook-based approach
Notebook-based pipelines are particularly powerful because they allow you to use your existing Jupyter notebooks (and leverage Naas pre-built templates library) as building blocks for your data processing and analysis workflows. This means that you can leverage the full power of Python and other programming languages, as well as a vast array of data processing and visualization libraries, to build custom pipelines that meet your specific needs. By using Naas to orchestrate these pipelines, you can easily automate your data processing and analysis workflows, and build full fledge data products freeing up your time to focus on higher-level analysis and decision-making.
Benefits
Efficient and Automated Workflow
Naas Pipeline helps you automate and streamline your data analysis workflow, allowing you to focus on the important aspects of your project. With Naas Pipeline, you can create a series of steps that will automatically execute your notebooks in a specific order, eliminating the need for manual intervention.
Easy to Use
Naas Pipeline is designed to be easy to use, even if you don't have any experience with coding or data analysis. With Naas Pipeline, you can create a pipeline by simply adding a series of steps using Naas templates, and the system will take care of the rest.
Monitor and Troubleshoot
Naas Pipeline provides you with a monitoring tool that allows you to keep track of the pipeline execution and identify any issues that may arise. With the "pipeline_executions" folder, you can easily review and analyze the results of the pipeline, and troubleshoot any issues that may have occurred.
How it works?
Using Dummy Steps to Design a Pipeline
When creating a data pipeline, it can be helpful to use "dummy steps" to map out the structure of the pipeline before executing it. Dummy steps are essentially placeholders that represent the various stages of the pipeline. They do not actually perform any data processing, but are used to establish the flow of data and to identify the specific tasks that need to be performed at each stage of the pipeline.
One of the main benefits of using dummy steps is that they make it easier to design and visualize the pipeline structure. By creating a clear and organized pipeline structure, you can make it easier for team members to understand the flow of data and to collaborate on pipeline design and execution.
Here's an example of how to use dummy steps in a pipeline to design the workflow before execution:
from naas.pipeline.pipeline import Pipeline, DummyStep, ParallelStep

# Define dummy steps to represent the workflow
collection = DummyStep("Collection")
cleaning = DummyStep("Cleaning")
transformation1 = DummyStep("Transformation 1")
transformation2 = DummyStep("Transformation 2")
distribution = DummyStep("Distribution")

# Define the pipeline using the dummy steps
pipeline = Pipeline()

(
    pipeline
    >> collection
    >> cleaning
    >> [transformation1, transformation2]
    >> distribution
    >> End()
)

# Run the pipeline
pipeline.run()
In this example, we define a set of dummy steps to represent different stages of a data processing workflow: collection, cleaning, transformation, and distribution. We then use these steps to define a pipeline using the >> operator.
In this case, we use a ParallelStep to represent the parallel execution of two transformation steps. This is useful when the output of one transformation step is independent of the output of the other transformation step, and they can be executed in parallel to save time.
Finally, we call the run() method on the pipeline object to execute the workflow. By using dummy steps, we can design the workflow and test it before actually implementing the code for each step. This saves massive amount of time and effort.
NotebookStep Pipeline
Naas Pipeline works by creating a series of steps that will execute your notebooks in a specific order. Each step is defined by a Naas Pipeline object, which specifies the name of the step, the notebook path for execution, and the parameters that are injected through papermill in the first cell or after the cell labeled "parameters."
from naas.pipeline.pipeline import (
    Pipeline,
    NotebookStep,
    End
)

pipeline = Pipeline()

step1 = NotebookStep("Step 1", "notebook1.ipynb")
step2 = NotebookStep("Step 2", "notebook2.ipynb")
step3 = NotebookStep("Step 3", "notebook3.ipynb")

pipeline >> step1 >> step2 >> step3 >> End()
pipeline.run()
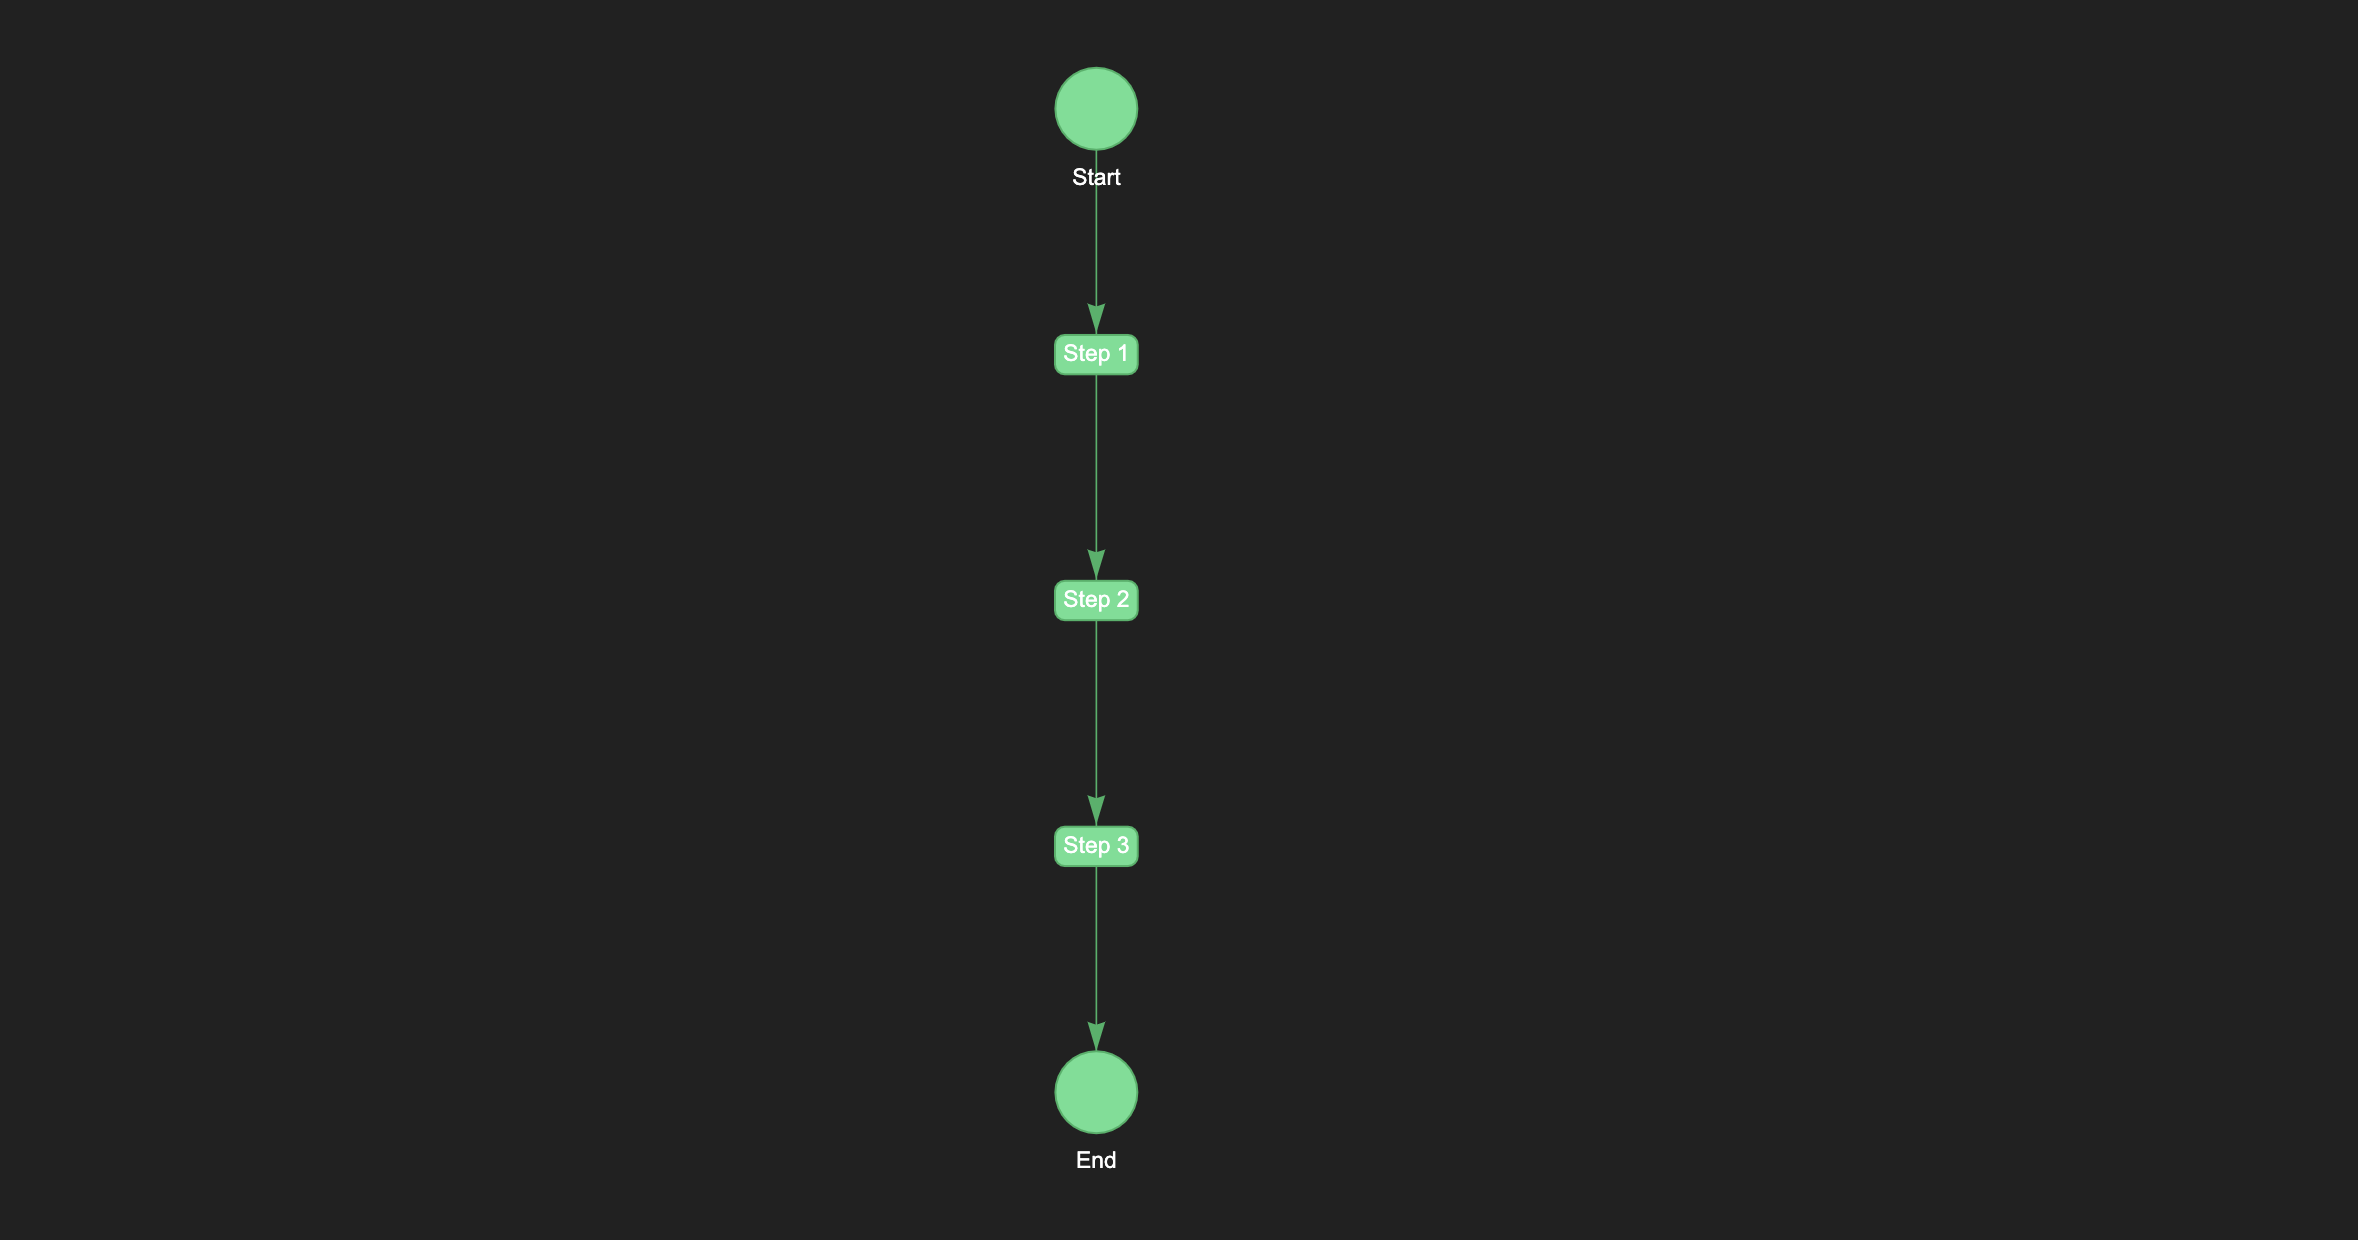
In this example, we define a pipeline with three steps, each of which executes a different notebook. The pipeline will execute the notebooks in the order defined by the steps, and the output of each notebook will be passed to the next step in the pipeline.
ParallelStep Pipeline
Parallel steps can be used to execute multiple steps simultaneously. This is particularly useful when you have multiple, independent steps that can be run in parallel, and you want to speed up the overall execution time of the pipeline.
To create a parallel step in Naas, you can use the ParallelStep class, which takes a list of steps as its argument. The steps in the list will be executed in parallel. Here's an example:
from naas.pipeline.pipeline import Pipeline, NotebookStep, ParallelStep, End
step1 = NotebookStep("Step 1", "step1.ipynb")
step2 = NotebookStep("Step 2", "step2.ipynb")
step3 = NotebookStep("Step 3", "step3.ipynb")
pipeline = Pipeline()
(
pipeline
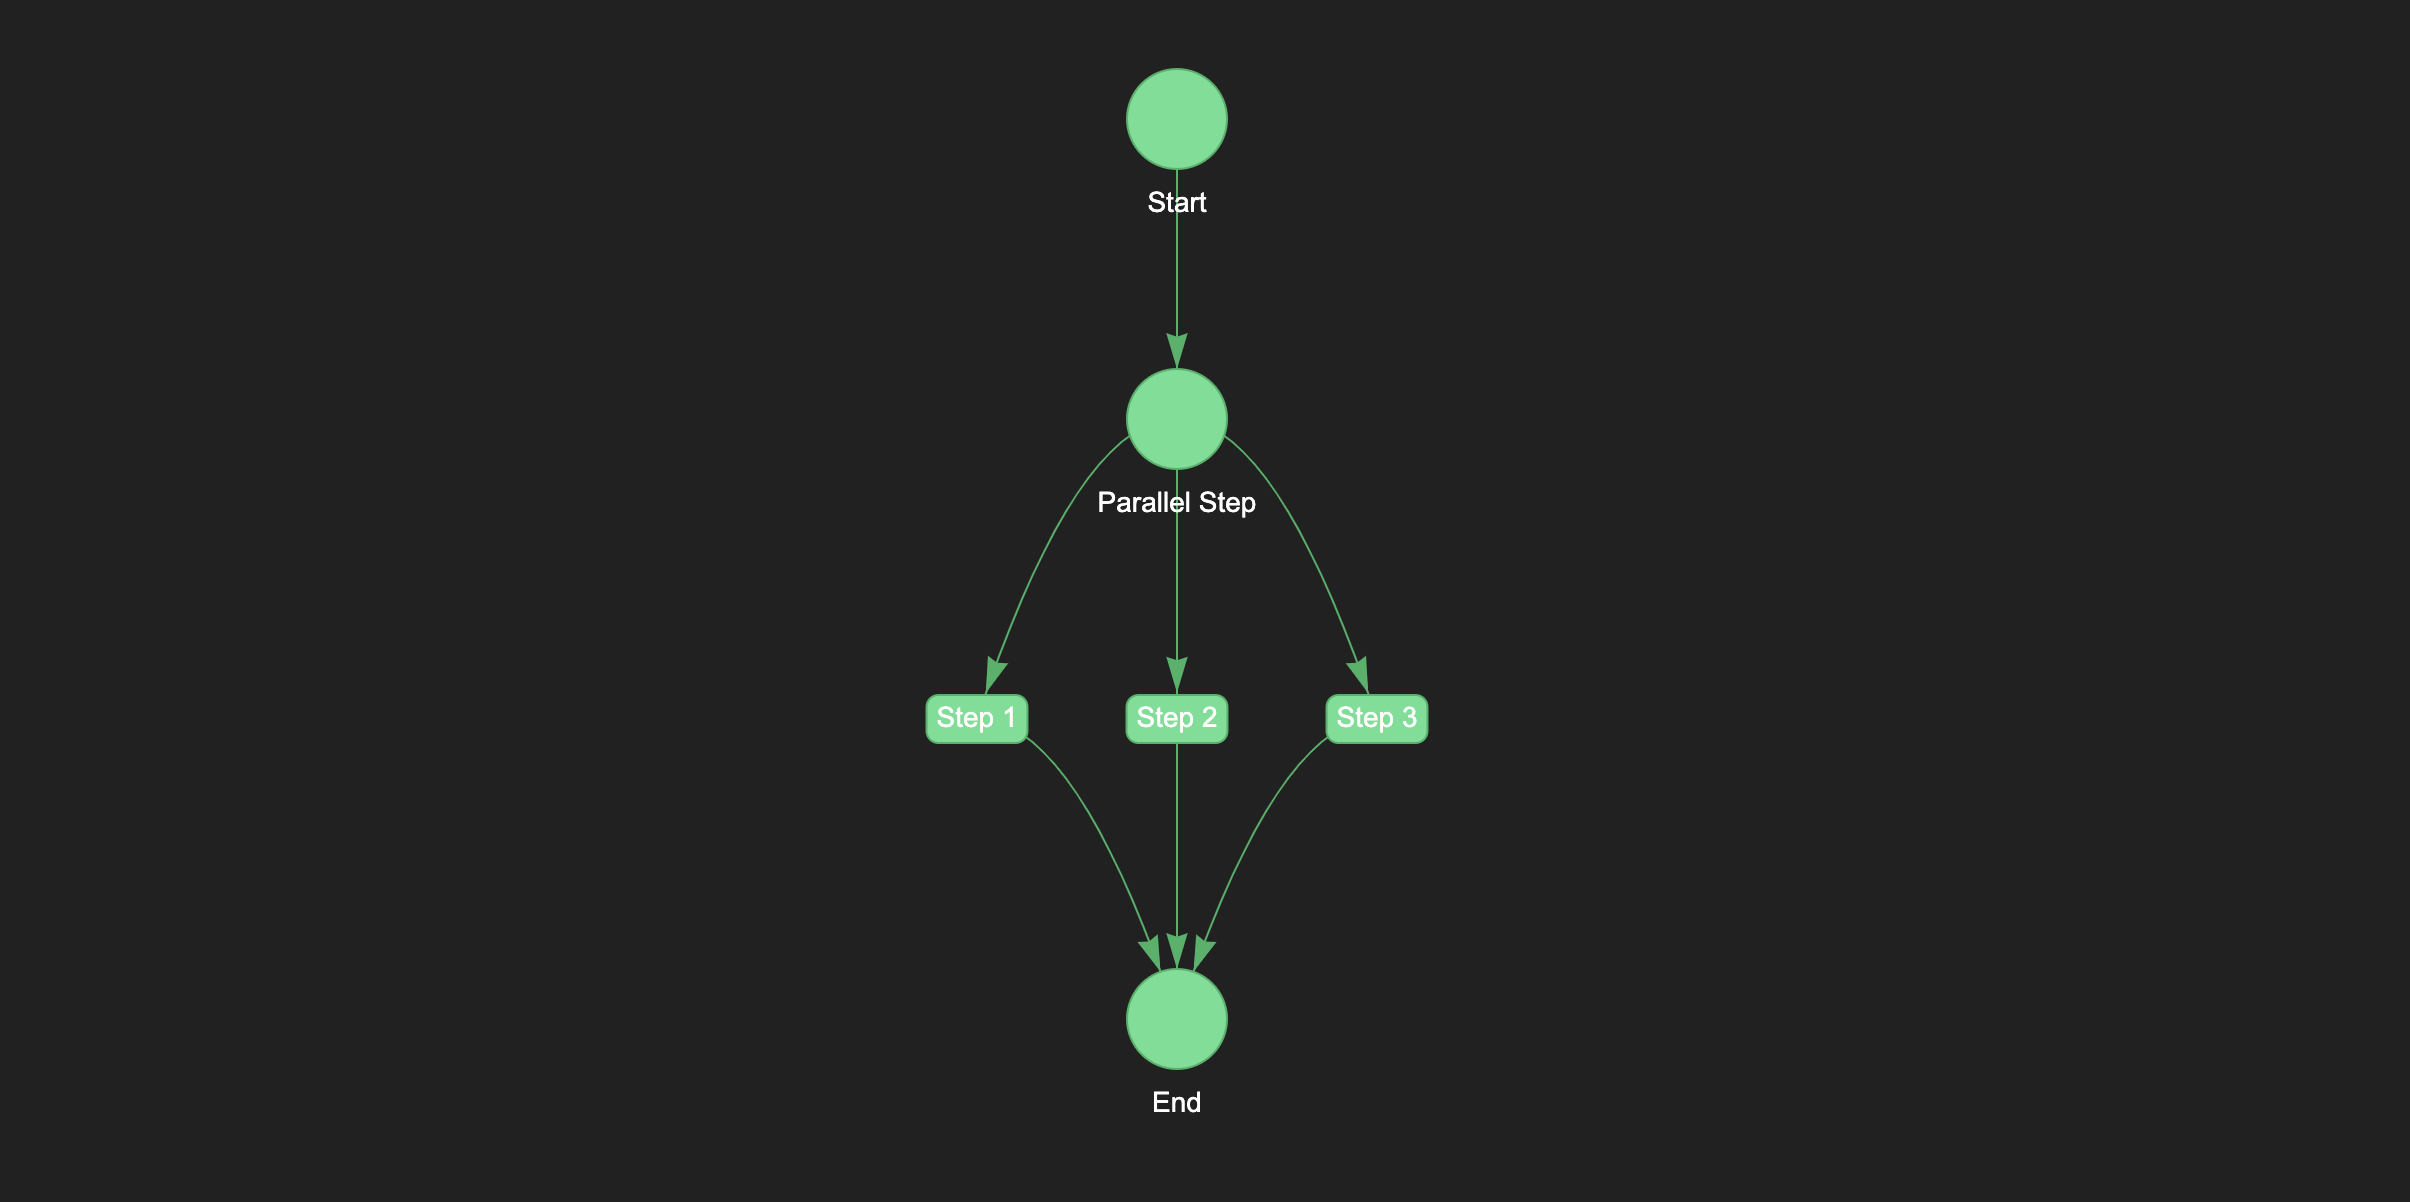
>> ParallelStep([step1, step2, step3])
>> End()
)
pipeline.run()
In this example, we have three steps that we want to execute in parallel: step1, step2, and step3. We create each step using the NotebookStep class and provide the name of the step and the notebook path.
We then create a ParallelStep and pass in a list of the three steps we want to execute in parallel. We add the ParallelStep to the pipeline using the >> operator.
Finally, we add the End step to the pipeline and call pipeline.run() to execute the pipeline.

When the pipeline is run, the three steps (step1, step2, and step3) will be executed in parallel, which can greatly speed up the overall execution time of the pipeline.
Combining Simple and Parallel Step Pipelines
To build a pipeline that combines simple and parallel steps, you can use the Pipeline object from naas.pipeline.pipeline and specify the sequence of steps using the >> operator. To combine parallel steps, you can group them in a list and pass them to the ParallelStep object.
Here's an example of how you could build a pipeline that includes both simple and parallel steps using DummyStep:
from naas.pipeline.pipeline import Pipeline, DummyStep, NotebookStep, End, ParallelStep

# Define the steps
collection = DummyStep("👇 Collection")
transformation1 = DummyStep("🤙 Transformation 1")
transformation2 = DummyStep("👐 Transformation 2")
storage = DummyStep("💾 Storage")

# Build the pipeline
pipeline = Pipeline()

(
    pipeline
    >> collection
    >> [transformation1, transformation2]
    >> storage
    >> End()
)

pipeline.run()
In this example, we create a Naas pipeline of four steps. The first step called "👇 Collection" can be used to collect data from various sources such as databases, APIs, or file systems. The next two steps "🤙 Transformation 1" and "👐 Transformation 2". These steps can be used to transform and preprocess data in a variety of ways, such as aggregating data, joining multiple tables, or calculating new fields. The final step called "💾 Storage", which can be used to load the data into its final destination, such as a data warehouse, a data lake, or a specific application.
Monitor and Troubleshoot Your Pipeline
Visual Displays (DAG or Table)
When building and running pipelines, it's helpful to have a visual representation of the pipeline to quickly see the overall structure and progress of the pipeline. There are many ways to visualize a pipeline, but one common method is to use a directed acyclic graph (DAG). A DAG is a graph that is directed (i.e., the edges have a direction) and acyclic (i.e., the graph has no cycles). In the context of a pipeline, each step is represented as a node in the graph, and the edges represent the dependencies between the steps.
Naas provides a visual representation of the pipeline in the form of a DAG, which can be accessed through the Naas UI. This DAG shows the structure of the pipeline, the status of each step (e.g., running, successful, failed), and the dependencies between the steps. This visual display can be helpful for quickly identifying bottlenecks or issues in the pipeline.
Naas aslo provides a table representation of the pipeline which displays the status of each step. This table is easily accessible by replacing pipeline.run() by pipeline.run(style="progress")
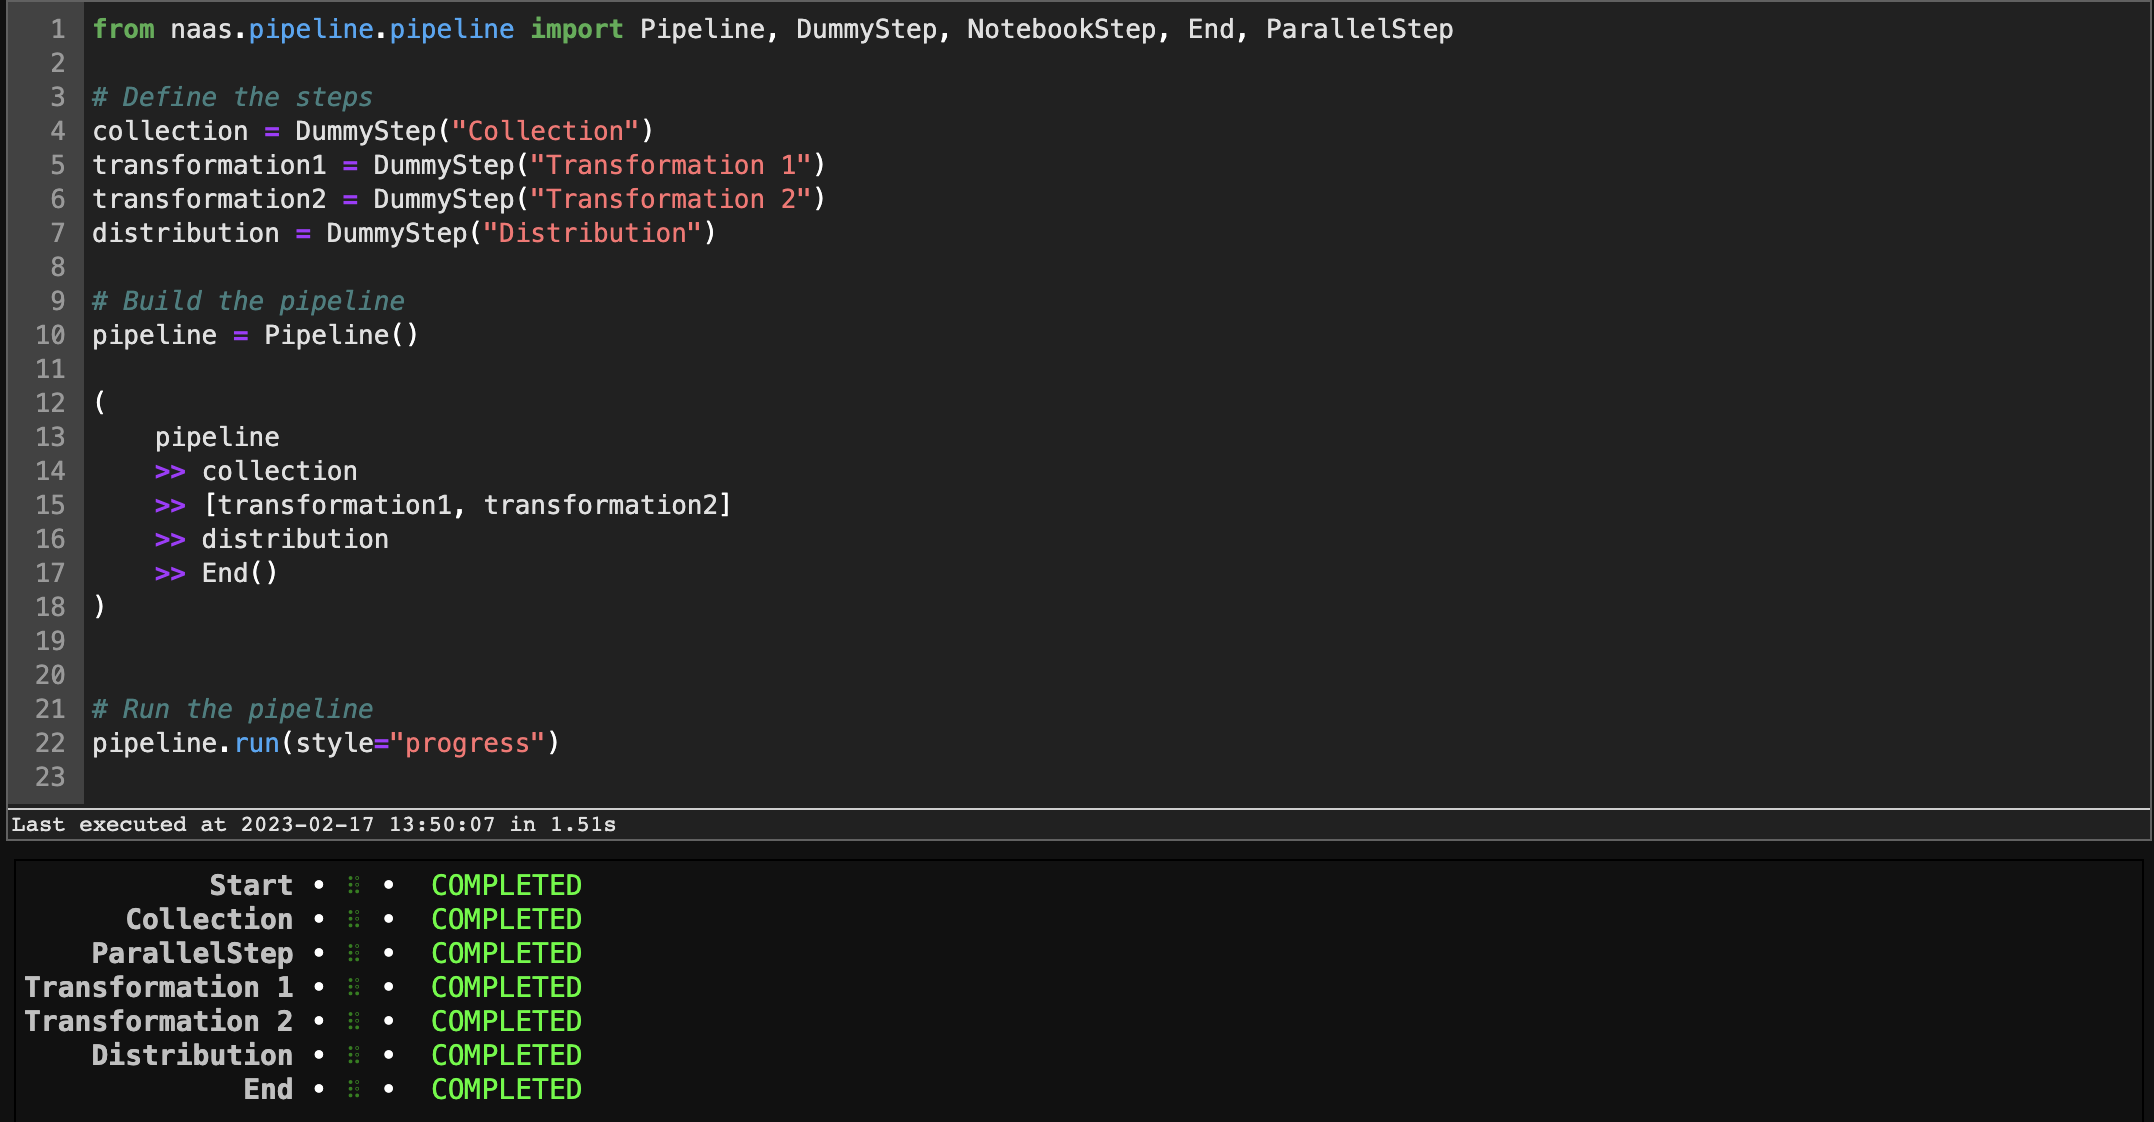
Color Coding
Another helpful feature of the Naas pipeline UI is the color coding of each step. Each step is represented by a box, and the color of the box represents the status of the step:
- Green: The step has completed successfully
- Blue: The step is currently running
- Red: The step has failed
By color coding the steps, it's easy to quickly see the overall status of the pipeline and identify any steps that have failed.
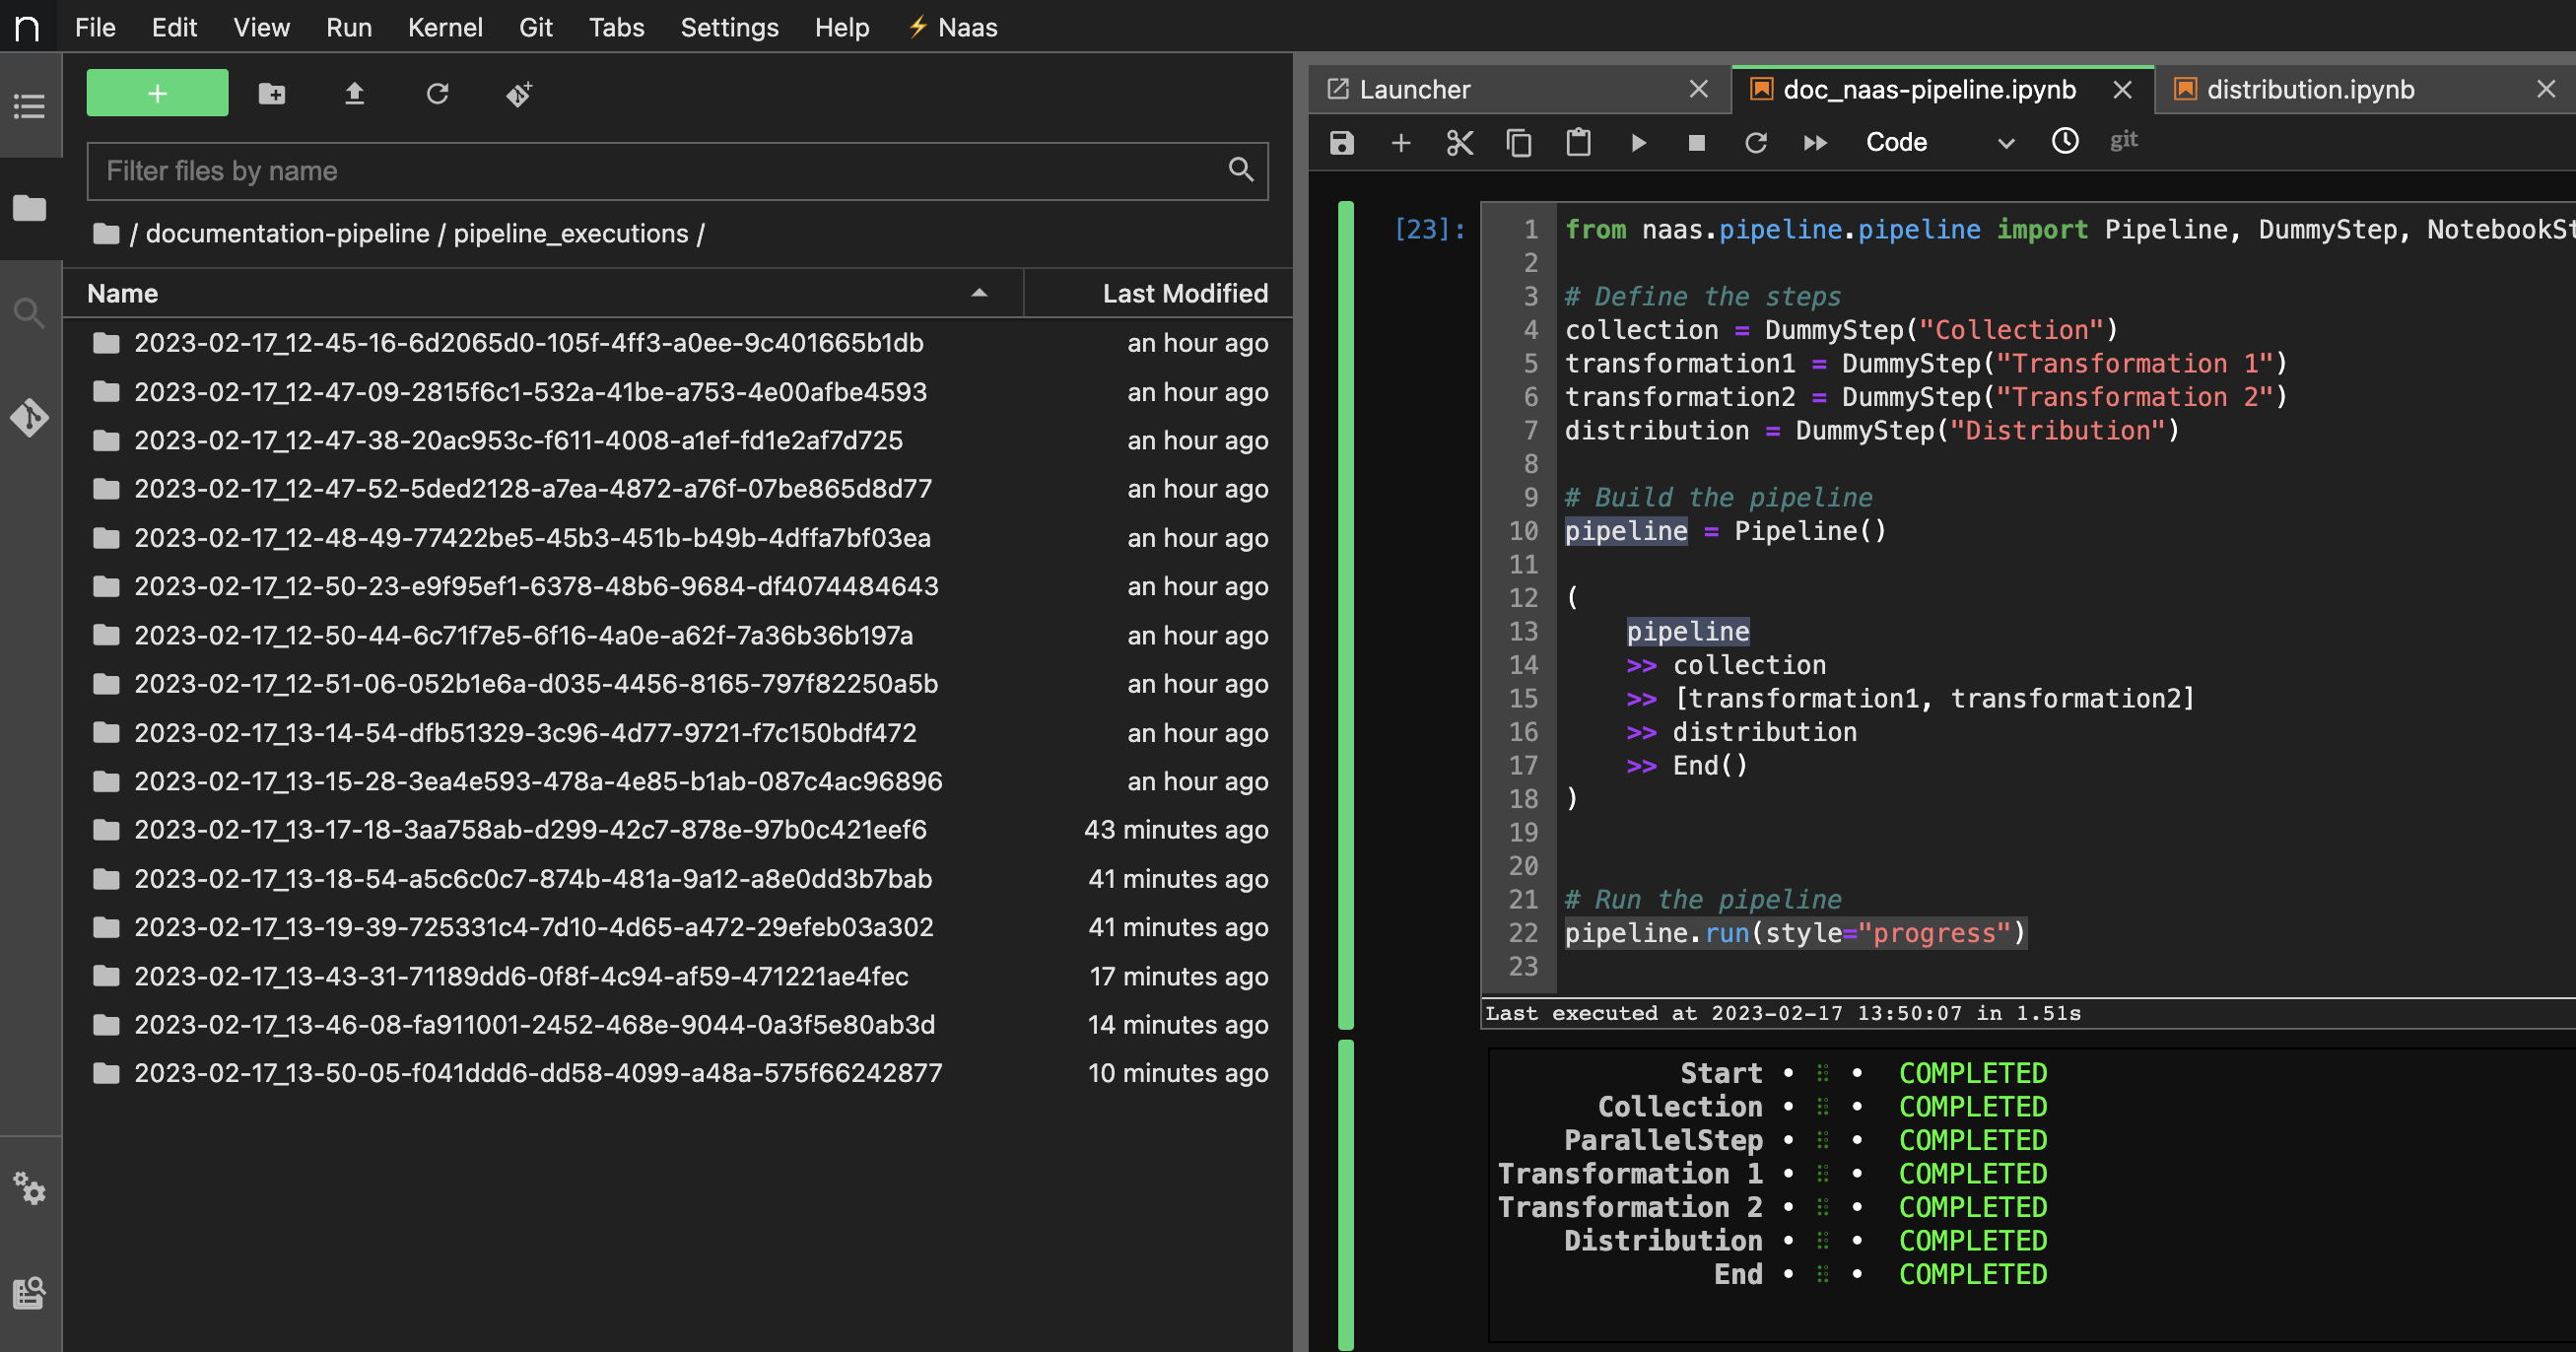
Pipeline Execution Folder
When a pipeline is run, Naas creates a "pipeline_executions" folder in the file system. This folder contains a subfolder for each pipeline execution, which in turn contains the executed notebooks and any outputs generated by the pipeline. By storing all pipeline executions in a single folder, it's easy to review and analyze the results of the pipeline, and to troubleshoot any issues that may have occurred.
If a step in the pipeline fails, it's often helpful to review the executed notebook to see where the failure occurred. By storing the executed notebooks in the pipeline execution folder, it's easy to access the notebooks and quickly identify the source of the problem. This can save a lot of time and effort when troubleshooting issues in the pipeline.
Managing Errors
In addition to monitoring the pipeline execution, it's also important to be able to handle errors that may occur during the pipeline execution. To do this, you can use the on_error method of a step to define what should happen if that step fails. For example, you can send a notification, run a fallback step, or stop the pipeline execution altogether. Here's an example of how to use the on_error method to send a notification in case the distribution step fails:
pipeline = Pipeline()

(
    pipeline
    >> collection
    >> cleaning
    >> [transformation1, transformation2]
    >> distribution
    >> End()
)

distribution.on_error >> notifications

pipeline.run()
In this example, if the distribution step fails, the pipeline will send a notification to the designated recipient. You can customize the notification message and recipient using the notification feature. This helps you to quickly identify and troubleshoot any issues with your pipeline.
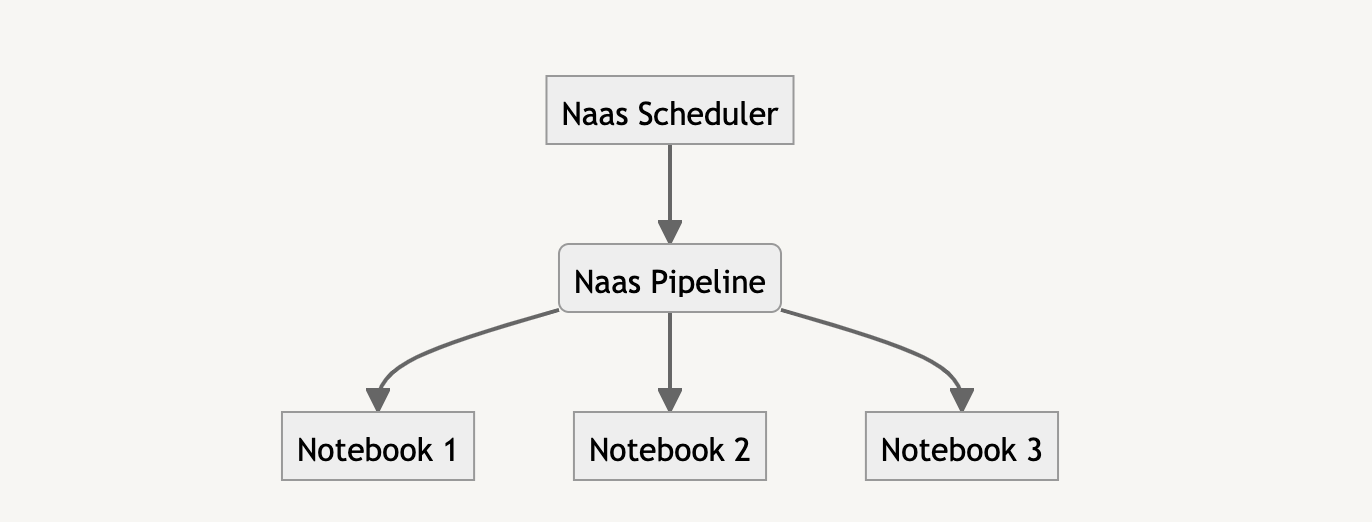
Orchestrate Your Pipelines with Naas Scheduler
Naas Pipeline provides a powerful and flexible framework for building data pipelines and products. However, pipelines are only useful if they can be run automatically on a regular basis. This is where Naas Scheduler comes in. Naas Scheduler allows you to schedule notebooks and run them automatically at specified intervals using CRON tasks.
By combining Naas Pipeline with Naas Scheduler, you can orchestrate complex data flows for your business. Here's how it works:
- First, build your data pipeline using Naas Pipeline. Define the steps of your pipeline, their dependencies, and any necessary parameters or inputs.
- Once your pipeline is defined, you can create a new notebook that imports your pipeline and sets it up to run automatically using Naas Scheduler.
- In the new notebook, use the Naas Scheduler to schedule your pipeline to run at specific times using CRON tasks. You can also specify parameters such as email notifications and success callbacks.
- Run the Naas Scheduler notebook to send it to Naas __production__ folder and let it run automatically according to the schedule you set up. Naas Scheduler will automatically start the notebook and run the pipeline at the scheduled times, even when you are not there.
By using Naas Pipeline and Naas Scheduler together, you can create complex data flows that run automatically and reliably. This can help you save time, reduce errors, and improve the efficiency of your data processes. Whether you're building a simple data pipeline or a complex data product, Naas Pipeline and Naas Scheduler provide a powerful combination for orchestrating your data flows.
Comparison with Other Data Pipeline Tools
Naas Pipeline is a Python package built on top of Papermil that allows you to build and manage data pipelines. It provides a simple and easy-to-use syntax for defining your pipeline and managing its execution. One of the unique features of Naas Pipeline is that it allows you to build pipelines using Jupyter notebooks as individual steps and to design your pipeline via DummyStep, which can be helpful for data scientists who are more comfortable working in a notebook environment. Additionnaly, Naas Pipeline can be further strengthened by its integration with Naas Scheduler, which provides a simple and powerful way to schedule and orchestrate data flows.
MetaFlow is another Python package for building and managing data pipelines. It is particularly well-suited for building machine learning pipelines and managing experiments. One of the key features of MetaFlow is its support for versioning and reproducibility.
Dagster is a data orchestration tool that allows you to build and manage complex data pipelines. It provides a simple and declarative way to define your pipeline using Python code, and supports a variety of data sources and compute platforms. One of the unique features of Dagster is its support for type checking and validation, which can help catch errors early in the pipeline development process.
Ploomber is a Python package for building and managing data pipelines. It provides a simple and declarative API for defining your pipeline, and supports a variety of data sources and compute platforms. Ploomber also supports templating and task dependencies, which can help simplify the development of complex pipelines.
In summary, while all of these tools share a common goal of helping users build and manage data pipelines, they have different strengths and weaknesses. Naas Pipeline is particularly well-suited for data scientists who prefer to work in a notebook environment, while MetaFlow is well-suited for machine learning pipelines and experiments. Dagster focuses on type checking and validation, while Ploomber supports templating and task dependencies.\
Need help?
If you need guidance on how to build your pipelines or data products with Naas, don't hesitate to ask for help in the Naas community or contact the Naas team with the internal chat inside the app.
Just use the following command:
import naas

naas.open_help()
# use naas.close_help() to close the popup